Someone literally woke up one day and decided to use beeswax and gelatin to colour and beautify their nails. That was in 3000 BC, China. The history of nail art is very fascinating. In various cultures, nail art has been practised since ancient times. Some used henna to cover their nails in orange. Some used egg yolk and some used gum arabic. The colour of the nails symbolised class - lower class in neutral shades and the upper class wore brighter shades.
Soldiers in some parts of the world used black and green kohl to colour their nails before going to war. The royals also used nail coverings to show their status. The coverings were made out of metal. Over the centuries, 19th- and 20th-century comrades have used nails as a form of self-expression.
A wide range of products for curating exhilarating designs is now readily available. People have generated business from this, looking forward to making it a USD 1.58 billion market by 2030. There are salons, celebrity-owned companies and DIY nail art projects built to beautify nails. In this article, we will look at the types of nails, how to do some quick and easy DIY nails and what the future holds for this industry. Below is a complete step-by-step guide for nail art.
Preparation of Nails [Skincare Nailcare]
Before starting polish and design, it is crucial to follow a basic nail care routine. By doing so, you can keep the nails in place longer. It ensures a smooth process and allows the nails to last longer. Below is a step-by-step guide for nail care before doing any type of nail art.
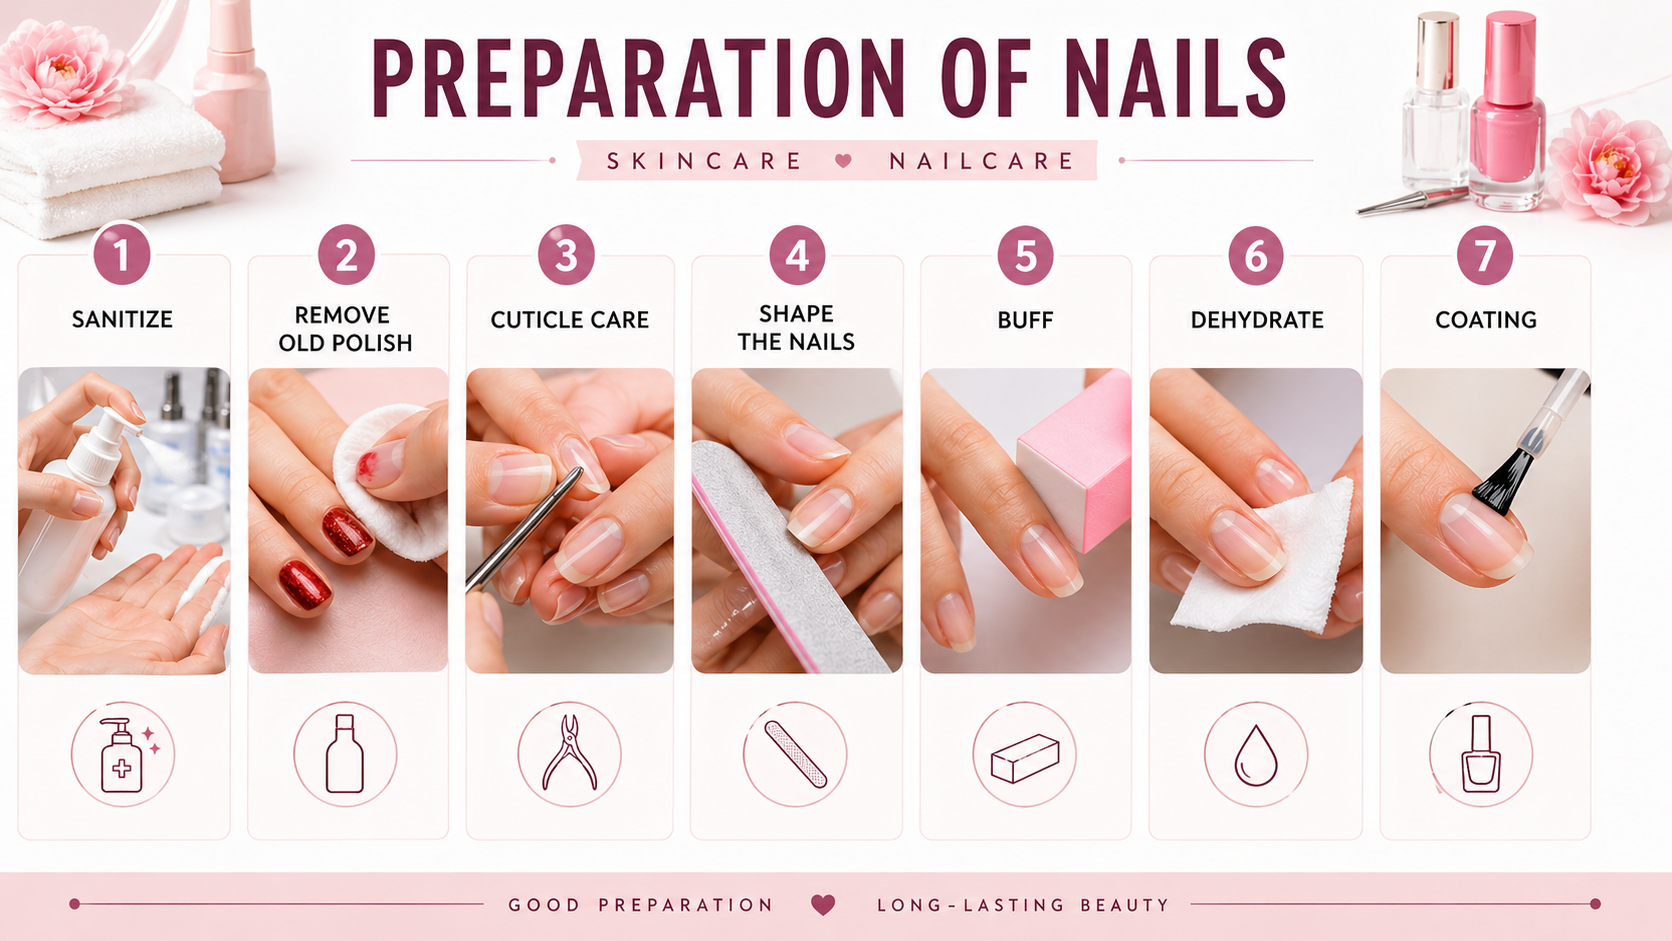
Sanitize:
Remove Old Polish:
Cuticle Care:
Shape the nails:
Buff:
Dehydrate:
Coating:
Any type of nail art, whether you are doing it on a client or for yourself, make sure you use a sanitiser on your hands. Apart from that, it is mandatory to sanitise all tools that will be used in the process to prevent infections.
After sanitising, use a non-acetone polish remover to clear the old polish, especially from the corners. Also, remove extra skin around cuticles.
After removing the old polish, use a hoof or cuticle pusher to push back cuticles. The manicures will appear very premium. You can use a nipper to remove the dead skin.
After cuticle care, use a file to give all nails a uniform shape. The common shapes include round, oval, square and almond. Use it from one side to avoid splitting.
After the shaping, buff the nails to make them matte, remove shine. This roughening can improve product adhesion. It will additionally remove all the extra oils in the nails.
After buffing, clean off the dust and oiliness. You can use a lint-free wipe soaked in 70% isopropyl alcohol or a store-bought nail dehydrater.
To protect the nail and give it a clean texture, like we use primer before makeup, use a nail primer or a base coat.
Types Of Nails
As stated, once we are done with the nail preparation, we move on to
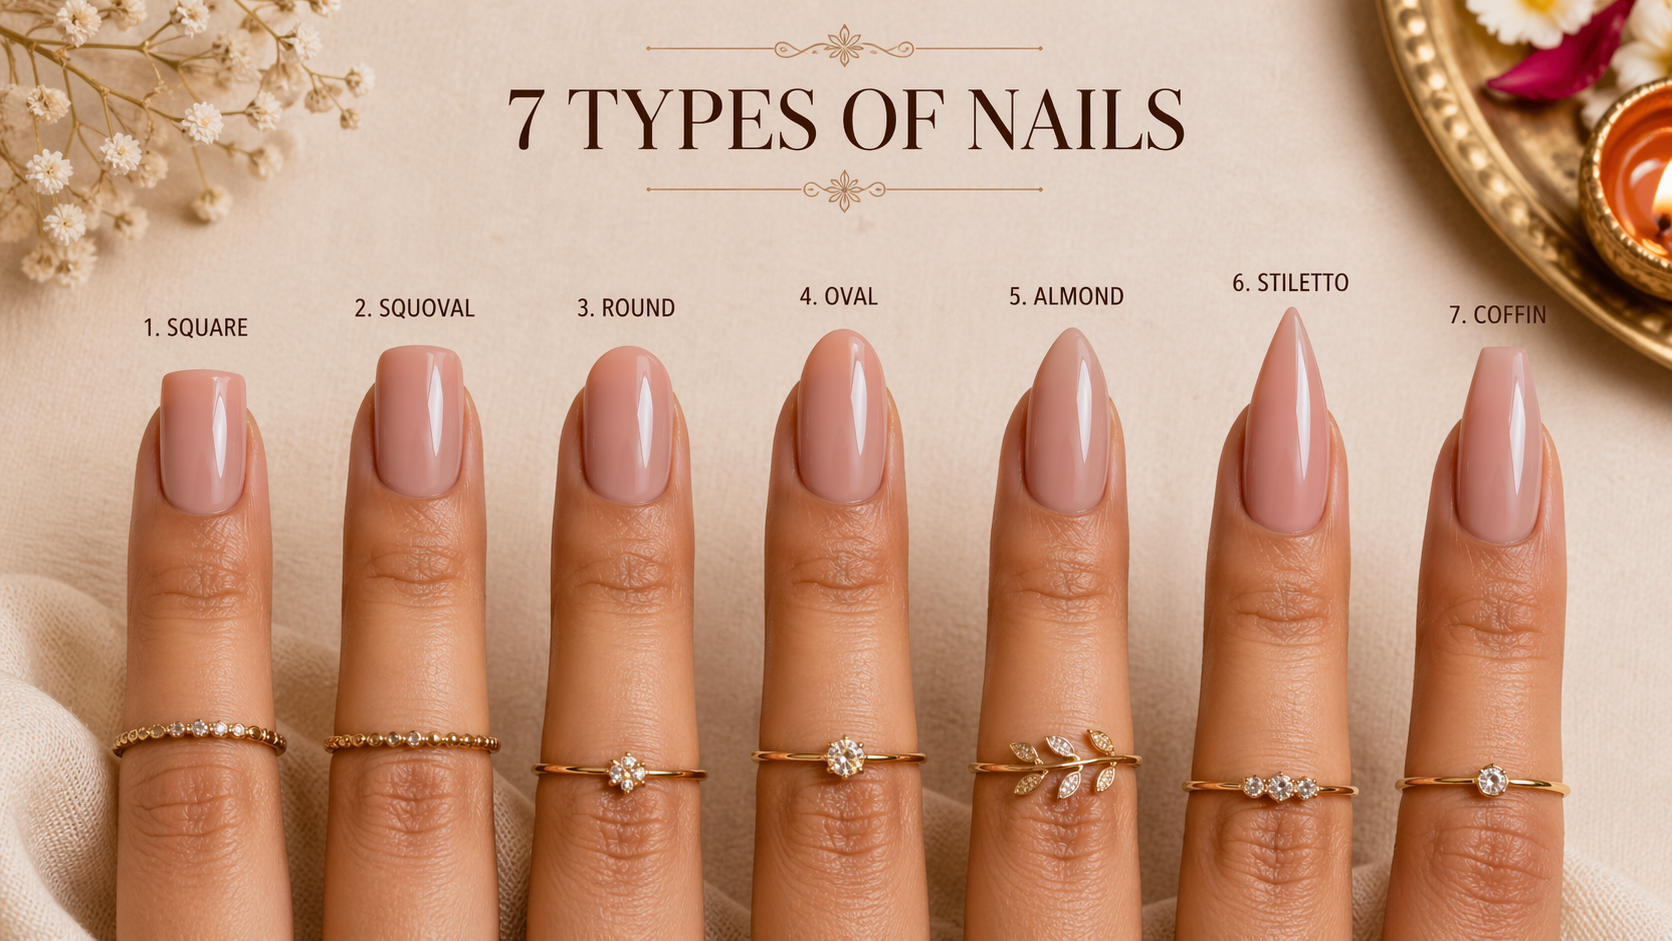
7 types of nail extensions can be curated to elongate the natural nails for creating proper space for the art. Below mentioned are their names:
Round: Round nails are straight but curved just at the very tip.
Square: These are straight on all sides with a flat top.
Squoval[Square + Oval]: Rounded like an oval from the tip, with straight edges of the square
Almond: Slightly pointed tip. Like Almond shaped.
Stiletto: Extremely pointed tip, sharpened.
Oval: More elongated than the round one.
Coffin/Ballerina: Tip like a ballerina shoe, tapered, slightly edged.
Types Of Nail Foundations
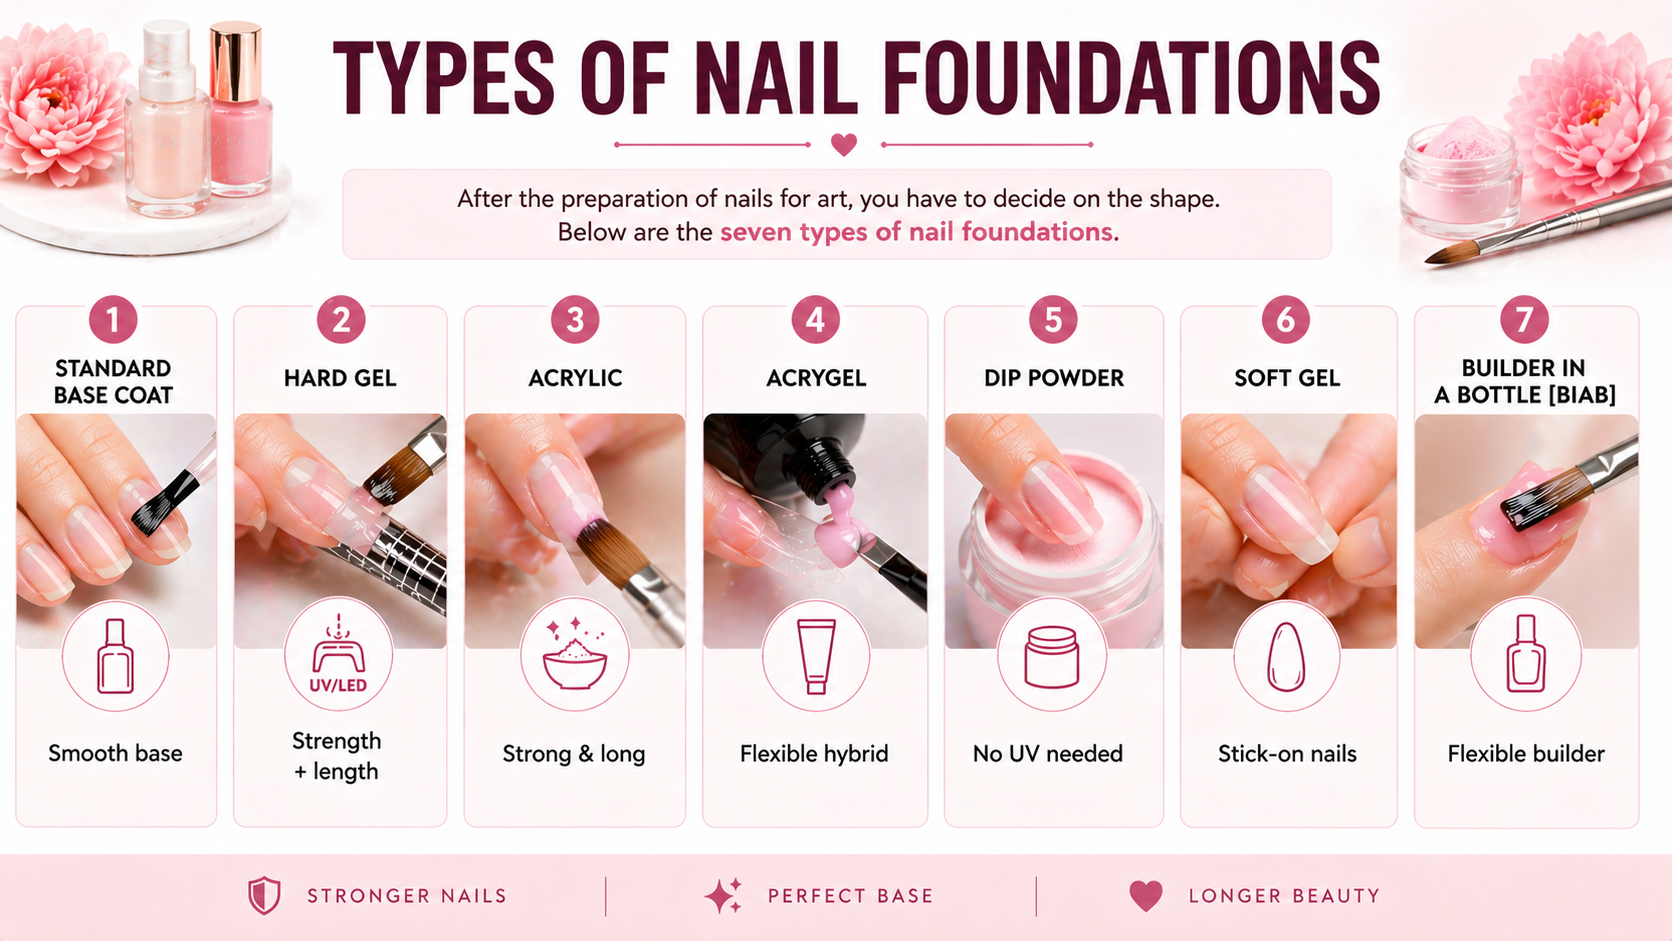
After the preparation of nails for art, you have to decide on the shape. If your natural nails are short, they can be extended and shaped using various tools and bases. Below are the seven types of nail foundations.
Standard Base Coat: To prevent staining the natural nails, this base coat is used under the basic nail paints. It creates a smooth surface for application.
Hard Gel: For sculpted shapes or long-lasting nail art, a thick gel base is used that can only cure under a UV/LED light. They help by adding strength and length both.
Acrylic: For dramatically long nails that require a strong base, a mixture of liquid monomer and powder polymer is used. It is very durable, and air dries into a hard layer.
Acrygel: A blend that combines acrylic and gel to make a base that is strong and flexible. It is more convenient to apply compared to traditional acrylics, and it comes in a tube.
Dip Powder: For the dip powder base, a bonding base needs to be applied to the nails first. Once done, the nail is dipped in a bottle of pigmented powder that settles over the bonding base. This base doesn’t require a UV light for drying.
Soft Gel: Also known as stick-on nails. These are gel nails that are shaped and ready to put on. A gel adhesive is applied to the nails, and then pre-shaped nails are stuck onto it.
Builder in a bottle [BIAB]: A brush-on version of Acrygel/ Builder Gel that helps with flexible sticking of mid-length nails.
The Post-Base Workflow
After the base is dried, the next step is to use the buffer to smooth everything out. If there are any bumps or uneven surfaces, it needs to be filed with a 180-grit filer. If you are opting for a French manicure or any other designs, the strokes may look wavy if the surface isn’t levelled.
Moreover, if you have used a gel base, it is crucial to wipe it with 70-90% isopropyl alcohol to bring up the hard surface. Post that, use a brush to remove all the filing dust from over the nail.
Once done, it is now time for polishing. There is a wide range of pigmented colours you can choose from. If it suits, you can also opt for hand-painted designs. Another option is stickers and decals that can be directly applied to the smooth surface. If you want, you can use chrome powder, but that requires a no-wipe top coat first.
Types Of Nail Art
The next step after building a strong foundation for nail art is getting started with your design. Based on materials and creativity, the following are the types of nail art that you can choose from:
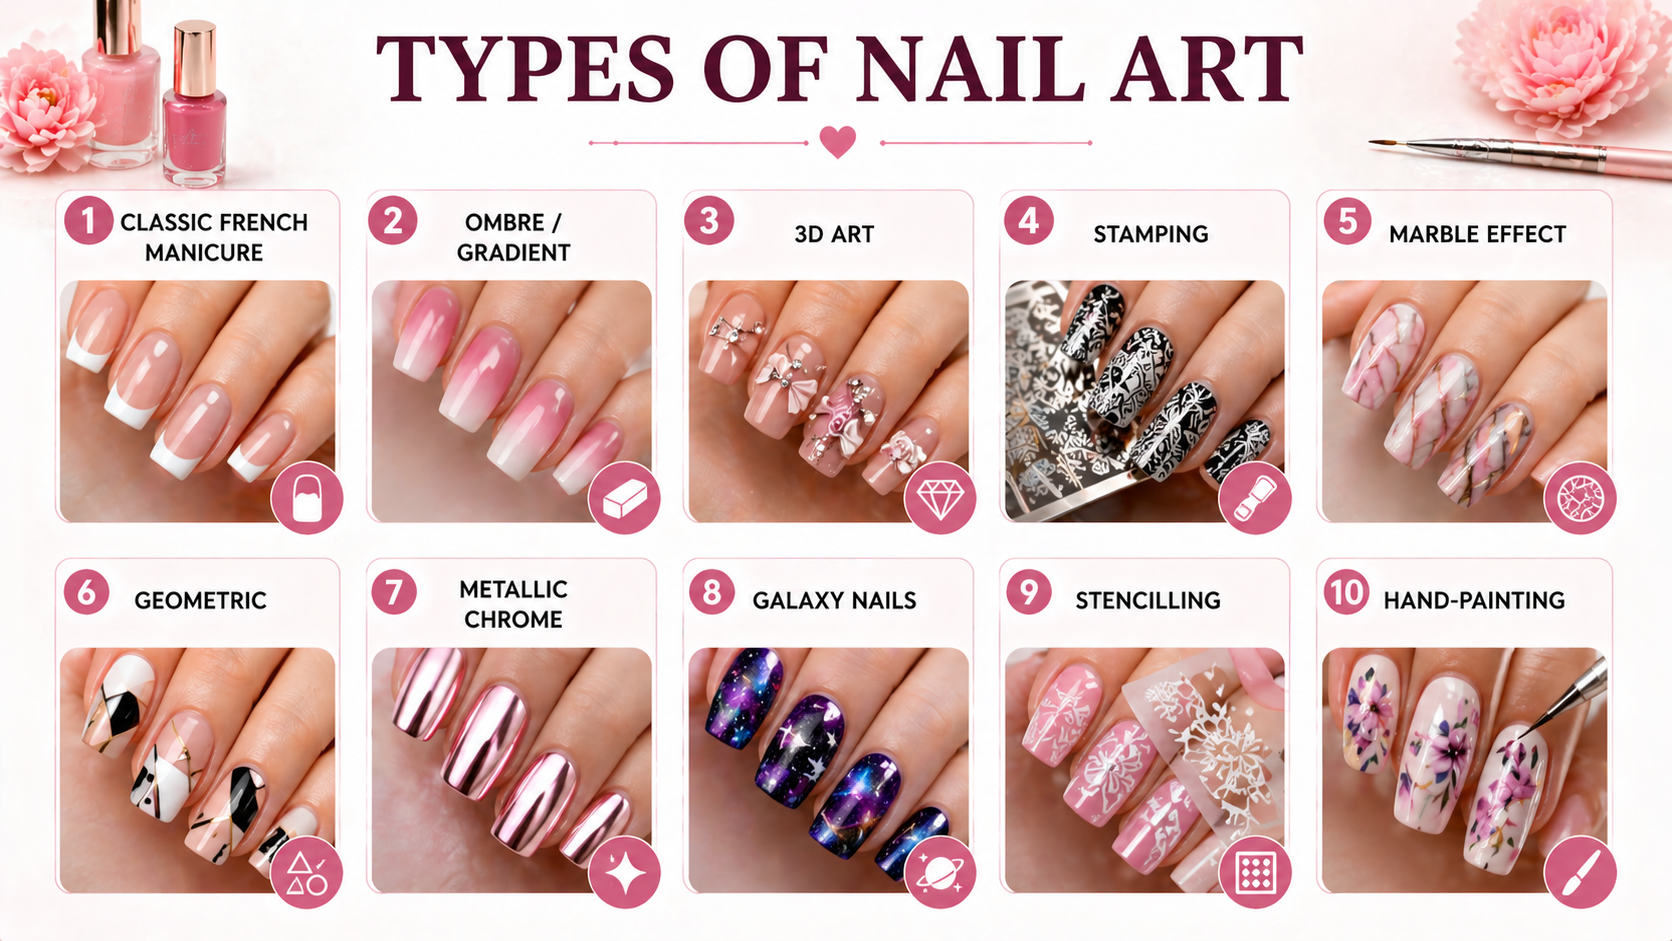
Classic French Manicure: This one is beginner-friendly and looks very elegant. It has a nude or pink base. Traditionally, it was finished with a simple white tip, but modern artists also enjoy a metallic or colourful tip.
Ombre/Gradient: Transition made by using a makeup sponge that gives a beautiful blend of shades. This one is also very easy.
3D Art: Involves 3D elements like rhinestones, charms, or beads stuck on nails.
Stamping: Intricate, meaningful designs are put on nails using a specific stamping tool.
Marble effect: Colours are swirled in a manner that the nails look like stone/marble.
Geometric: Simple lines, different shapes and dots.
Metallic Chrome: This effect is created by using specialised powders and foils to create a shiny effect.
Galaxy Nails: These nails use outer space as inspiration. Prominently deep purple and blue are used along with sparkles for a glittery effect.
Stencilling: This one is again beginner-friendly. Pre-cut stencils are used, put on the nail, designed and removed, revealing a beautiful output.
Hand-painting: These require a little practice and precision. Flowers or characters are hand-painted with special brushes over the nail.
Current Nail Art Trends [2026]
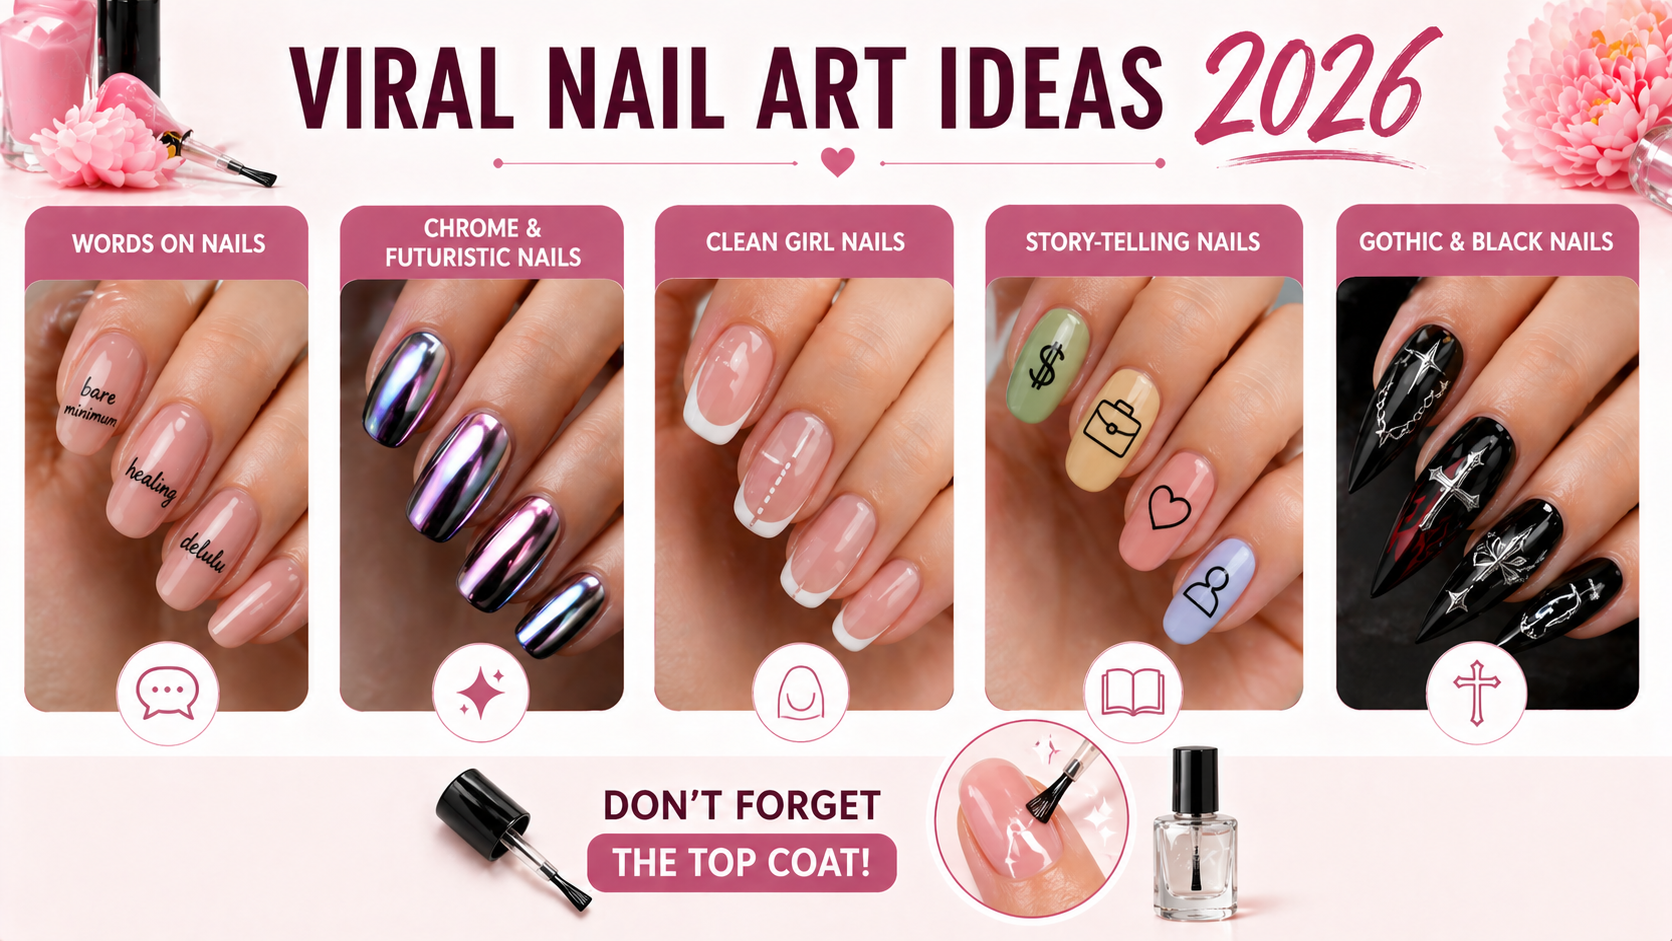
Until a few years ago, nail art used to be about pretty colours and seasonal shades, whatever matched well with the outfit. But in 2026, the game is different. People are more focused on making their nails speak of their personality. Designs are more of a reflection of their style rather than design. Have a look at the currently viral nail art ideas in 2026:
Words on nails: Short relatable phrases like bare minimum, healing and delulu are etched on the nails using a toothpick or specialised thin brushes.
Chrome & futuristic nails: The chrome powder is sprinkled over a dark base and then rubbed off with hands or a sponge, layering it with a top coat, which gives it a futuristic shine.
Clean girl nails: These nails are similar to French manicured nails, dotted lines, or simple strokes.
Story-telling nails: These are different for each finger. The thumb is for money, the index finger for career, the middle finger for emotions, the ring finger for emotions, and the pinky finger for identity. Icons related to these are etched upon in different colours based on current moods.
Gothic and black nails: Edgy or shady designs in black or red shades are used for these nails for personalities who are really passionate about the culture. It involves symbols like stars and crosses in white.
After the design, do not forget to do a top coat.
Aftermath
The nails that you customise and DIY speak for you. The ten tiny canvases showcase your personality better than any IG post or caption. Many DIY kits are now available at affordable rates in the market. They are creative and customisable. Prominent actors like Sonakshi Sinha are also co-developing brands for nail art. It is a thriving business.
Men in industry, like Siddharth Batra and Ankush Bahuguna, are breaking stereotypes by choosing to wear nail art regularly. With that said, try your hand at a beautiful nail art design and share your experience with us.